How to Take a Three-Colour Image using iTelescope
Making a three-colour image is slightly more complicated than taking a one-click image. If anything, you will have to make more clicks! On a more serious note, this time you will have more options as you prepare your observations. You may encounter unknown terms, so in addition to explaining the procedure we will focus here on clarifying some of the jargon to make the process of preparing and taking your images go smoothly.
There are two ways to take a three-colour image. You can run observing script without making any plans and reservations. The better, more secure and recommended way is to make an observing script in advance and reserve time on a telescope of your choice.
Regardless of which of these two ways you want to use, first you need to login to your iTelescope account and select the telescope you plan to use. The starting point is the main page of the telescope of your choice (T18 in this case):

In this tutorial we will mainly focus on how to take the images. For more help on how to prepare your observations beforehand, which targets to choose, which telescope to use, etc., please refer to Help on Preparing Observing Project Proposal.
Run Scripted Plan
This is a prefered way of conducting your observations. It is also more convenient as you do not have to monitor observing process in real time. You will have to generate a plan i.e. select a set of instructions for the telescope, and reserve a time on the chosen telescope when your source is available on the sky. Everything is done automatically, and once the observing run is finished, you will get confirmation email (just as you did when you took One-Click Image). So, these observations can be done while you are in class, having dinner or sleeping! Once the observing is complete you will have to download your files. On instructions how to do this, please visit the Downloading Data from iTelescope.
Make a Plan
- Click on the Plan Generator link on the left side panel.
- You will be redirected to the following page:
- Clicking on Catalog Information will bring up two tables:
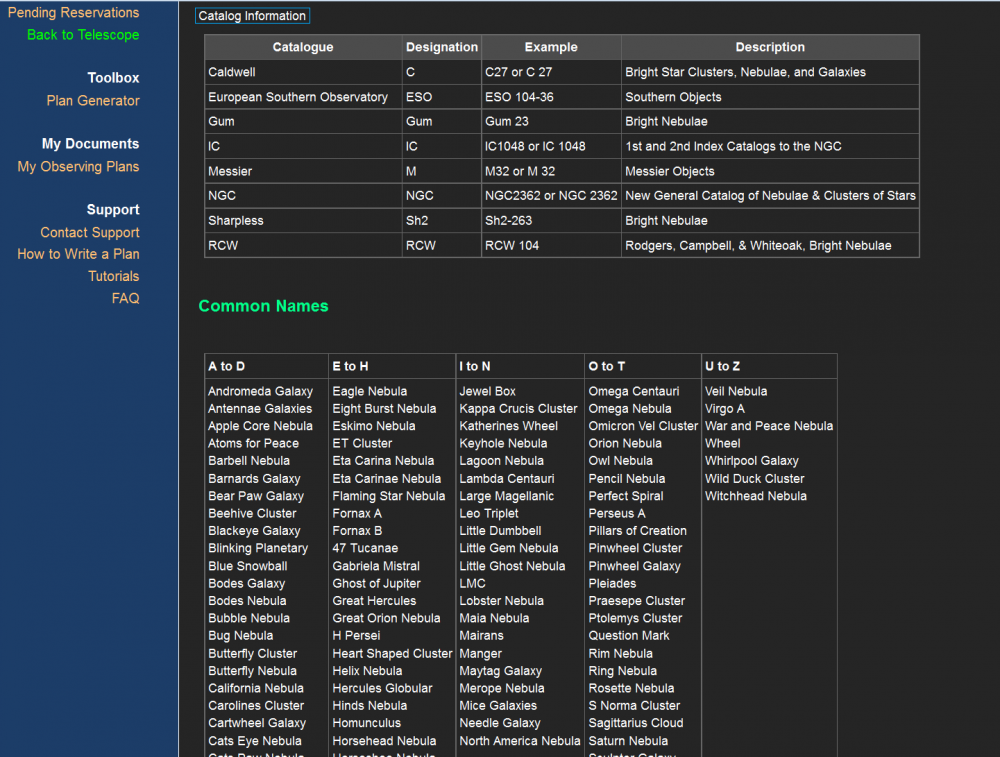
- The table on the top contains a list of some of the most popular astronomical catalogs. The column on the right contains description on what kind of astronomical sources are in a particular catalog. This could be your starting point of research if you are not sure what you would like to do or have no idea what kind of celestial sources are up on the sky. When typing in the name of your target you have the option of using either the catalog designation followed by the number of your source in that catalog (just as it is given in examples in this table) or you could use a common name of your source if it is one of the more popular and frequently observed sources (as given in the bottom table). For example, we will prepare a plan to observe one of the most popular sources on the sky from the Messier Catalog. The object is knows as M42 - the 42nd object in the catalog originally published in the 18th century by Charles Messier. This object is the closest massive star forming region and it is also known as Orion Nebula since it is projected on the sky within the Orion constellation. Hence, you can either use M42 or Orion nebula for Target Name. You can also click on Deep Sky Catalog Search although this way did not prove to be very useful unless you already have a good idea of what kind of object you are looking for. If you just want to search through the catalogs without specifying search parameters more tightly the resulting list will be limited to the first 100 sources. Please refer to the Source Selection section for more help on selecting targets for your project.
- You can also specify the name of your plan. Once you are done preparing your plan a text file with the name of your plan will be generated. You will later upload this file when reserving time on the telescope.
- After you enter the target name, click on Get Coordinates or Ephemeris or enter the coordinates of the source (Right Ascencion and Declination) if you know them. We suggest you let the iTelescope interface fetch the coordinates for you.
- Clicking on Get Coordinates or Ephemeris will not only fill up the coordinates fields but will also bring up the following message window:
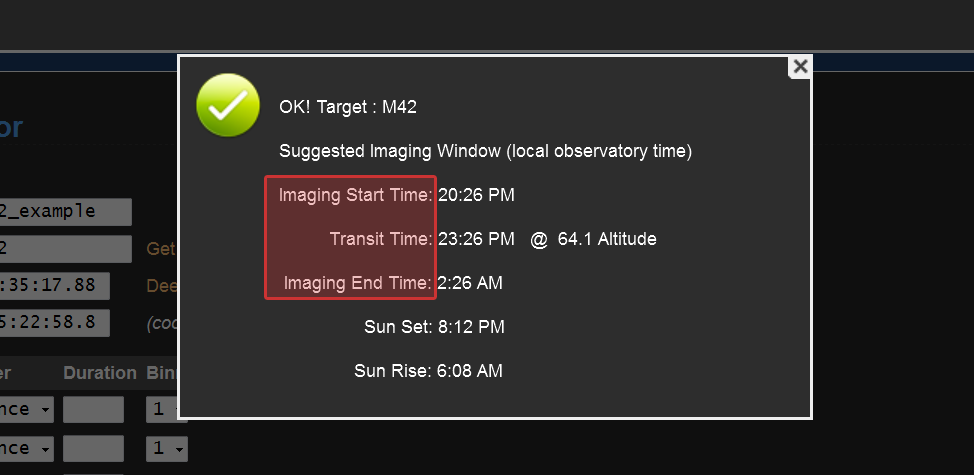
- The information contained here will be very useful when reserving time on the telescope as it tells you the time frame during which the source is going to be visible on the sky. Since the time given here is in local time where telescope is located, you don't have to worry about time zones, just make sure the time slot you select when making reservation falls within this period. Transit time refers to the point in time when the source you want to observe is at the highest altitude on the sky - it is basically a halfway point between rising and setting. To learn more how is this relevant and for other tips on how to select sources, please look here.
- If you select the source that is not visible from the telescope you initially chose at any time, you will receive the following message:

- For instance, we chose to observe M31, which is a spiral galaxy in Andromeda constellation, using one of the telescopes located in Siding Spring Observatory, Australia. However, this source is never visible from Australia! Don't worry if you get this message and you really want to study the source you chose. Look at the other available telescopes on the Northern Hemisphere. For help on what to look for when choosing a telescope, please refer to the Telescope Selection page.
- In the next step, you will select options and give telescope instructions to take your three-colour image. The three-colour image is made when filters of different colours are placed in front of monochromatic CCD camera one at a time these images are later combined using appropriate software. Think of camera as your eyes (although you don't see in black and white) and filters as sunglasses. You have probably noticed that, depending on the tint of your glasses, things in front of you will either look more brownish, or blue-green, or if you are very chic, pink! The glasses will let some of the light in and block the other parts of light spectrum. When you took One-Click image the telescope took your image by using default, clear filter known as luminance filter, which lets most of the light to which our eyes are sensitive to. In addition to luminance filter you will select other three broadband filters Red (R), Green (G) and Blue (B).


You also noticed that exposure time was already selected for you and it was usually 5min