Get Started with iTelescope
Once your account has been set, you are essentially ready to make your first observations. All you need is a web browser and Internet connection. You do not have to install any additional software. The website does not indicate any preferred browsers, but note that all the testing has been done with Google Chrome and as of yet, we have not experienced any glitches.
Firstly, go to www.itelescope.net.

We strongly encourage you to explore the main page and the links provided there. Here, in our wiki instructions, we are going to focus on the necessary features of this platform you will need to conduct a successful observing run and obtain good quality data.
Contents
Login into your iTelescope Account
In order to login into your account and either check the real-time telescope status and other information, obtain a one-click image, or prepare your observing plan and reserve time you can click on Telescope Login tab (circled in red in above photo) or just go directly here. This is what you should see:

You should have received a confirmation email from support@itelescope.net when we opened your account. This email contains your login information.
- Your username is your UTORID.
- Your password is the first four letters of your utoronto email, followed by your UTORID. There are no breaks or special signs in between. Only take into account the first four letters in your email, not dots.
For example:
Let's say your name is Therem Harth Estraven.

Your UTORID is estraven
Your utoronto email is therem.harth.estraven@mail.utoronto.ca

Your itelescope account *username* is going to be *estraven* (your UTORID).
Your itelescope account *password* is going to be *therestraven* (the first 4 letters of your utoronto email (*ther* in this case), followed by UTORID (*estraven*).
Once you enter your username and password, you will be re-directed to a page iTelescope.net calls the launchpad application. It should look like this:

Launchpad
At first, the launchpad page may look overwhelmingly complicated as there are so many things going on. Don't worry! Look at it as your main control station. From here you can access telescopes within the iTelescope network, check your account status, weather details and day/night map, but most importantly this is where you will access the telescopes and check which ones are available. Let’s look at the main features of this page:
Telescope Status and Access
This is probably the most important section of this page as this is where you access the chosen telescope. You can see the list of all 19 telescopes within the iTelescope network which are available to you (note that telescopes listed as T19 and T50 are privately own and are not available to us).


- The telescopes are listed according to their locations – on the left, you will find those located in Mayhill, New Mexico (USA), Sierra Nevada Mountains, CA (USA), and Nerpio (Spain) for the Northern Hemisphere. The only observatory in the Southern Hemisphere is Siding Spring Observatory (Australia) with variety of telescopes available. Having telescopes on both sides of equator allows you a flexibility in choosing a variety of sources and observing during different time zones (more on that here).
- The name of the telescope, which consists of a green letter T and a number, is followed by that telescope’s status. If you click on the telescope name you will be redirected to a page containing more detailed information about the telescope you want to use: operational notes, its location, camera properties, available filters, field of view (FOV), telescope optics, etc. For instance, if you click on T18 you will be sent to a page which looks like the image on the right. We strongly recommend that you read the operational notes carefully as it may contain some useful information and instructions specific for that particular telescope. For instance, this section might contain suggestions on how long each exposure should last in order to automatically obtain calibration data.
- If you click on the telescope status, you will be redirected to the telescope main page. The first time you click on a specific telescope status you will be prompted to enter your username and password – the same username and password you used to login into iTelescope network. If you allow your browser to remember the login info, you should not be prompted again to enter this info. If not, you will have to provide authentication every time you want to access this particular telescope.
- After you successfully login, you will be redirected to the main page for that particular telescope.
- Telescope Status: let see what kind of status options you may encounter on the launchpad page and what each of them means. Conveniently, each status is colour coded:
- Closed: Day Time – telescopes are on the location where is currently a day time, hence they are closed and you are not able to use them. In principle, one can observe the Sun during the daytime if appropriate filters are available, which is not the case for iTelescope network. Please note that during this time you can still access the telescope page, check the telescope schedule and generate the observing plan for observations to be conducted when the telescope is available. For instructions on how to make the observing plan and check the status of current observations, please click here.
- Closed: System Maintenance or Roof Closed or Offline – these are cases when telescopes are not available for variety of reasons. If the weather on the location is not appropriate for safe and successful observing, such as high cloud coverage, rain, snow, high winds, etc., the roof might be closed. If there are any technical issues with the telescope, the support staff will disconnect it from the network (hence Offline) or it might perform a scheduled maintenance. The bottom line is that you are not able to observe with them and the system will re-direct you to the following help page.
- Unfortunately, you will not able to even prepare an observing plan during this time. Hence, if you want make an observing plan using the telescope with the status given in red letters you will have to wait until the issues are resolved. In case of unexpected circumstances that will make the telescope of your choice unavailable for a longer period of time, such as technical issues or prolonged bad weather, we suggest you look for another telescope in the network with specifications that will allow you to reach your science goals. If you want to take a one-click image we suggest you search for another telescope within the network that is available at the time. For more instruction, please see our troubleshooting page.
- In Use or Reserved – as the name suggests, someone is currently using this telescope. When the telescope is In Use or Reserved you can still access it to prepare your observations.
- Available – this means that the telescope is currently open and available for you to use. During this time you can make the one-click image, generate a plan, make a reservation, and even run an image series directly or from a scripted plan in the real-time i.e. without a reservation. If this is the case, we strongly suggest you check the telescope schedule. If you start running observations for which you did not previously reserve the telescope time, and someone else’s scheduled plan starts running, you will be kicked out of the system.
Other Launchpad Features
- Drop down menus

- In general, you may ignore these menus. You will not need any of the actions available on the left drop-down menu. Regarding the reservations (middle) and offline plan generator (right) we suggest you access these options through the telescope lists. We found that the browser is occasionally non-responsive once the selection through this menu is made. Hence, to avoid any further confusion you can safely ignore this part.
- Day/Night Map
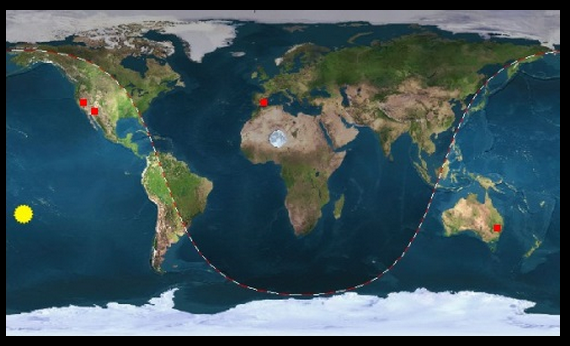
- Hopefully, this section is self-explanatory. It allows you to quickly check whether the telescope location is in the night-time zone. The main four locations within iTelescope network are marked by red dots. You will not be able to observe when the telescope location is closed to the day/night line which is marked here by the red-white, curved, dashed line as those are the areas on Earth that are either experiencing twilight or dawn. This means that the sky would still be too bright to obtain any meaningful observations.
- You might also notice the signs for the Sun and the Moon. The Moon is illustrated in its actual current phase. This can be useful as at some point you might have to take into account the Moon brightness. For instance, during the full Moon phase the sky can get fairly bright especially close to the Moon. Hence, it can be harder to focus and calibrate the telescope, and your target may be washed out in the Moon glow, not giving you reliable data. For more information on how to account for the presence of absence of the Moon, please go here.

- Weather Information
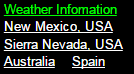
- The links given here will re-direct you to the pages contained detailed weather information for the telescope location.

- Your Account Status

- Aside from your user name and the group you belong to, you can see the amount of remaining points in your account. This will be important to track during your project as you will be required to work with the number of points allocated to your observing project.
- All Sky Cameras and some general notes on the telescope location allow you to have a brief overview of the local telescope time, time of local sunset and sunrise, Moon’s altitude on the sky and its illumination, and the Sun’s altitude on the sky (basically, the negative number means that the Sun is below the horizon, i.e. it is nighttime).

- Telescope Rates are listed at the bottom – each number represents a number of observing points per hour of exposure time for a given telescope. On how to use this information when preparing your observing proposal, please click here.

- In the middle of the page there are number of different links you are welcome to explore, especially the links to the iTelescope social media platforms. We found iTelescope Member's club on Facebook particularly useful. It is a closed group so you will have to send a request to join. You are encouraged to also check the link to System Alerts and Operational Notes for the last minute updates.

If you are experiencing technical difficulties or need more help, please go to our FAQ/troubleshooting page. If the issues persist, please contact us directly through course Discussion Board on Portal or email address pmu199_AT_astro.utoronto.ca. Please, do not email the telescope support staff directly.